|
0. Contents
1. Overview
2. User interface
3. Advanced configuration
4. Configuration files
5. Templates
6. Installation and Requirements
7. Commandline parameters
8. Bugs and other "special features"
9. License
|
|
1. Overview
This program supports converting IMS-manifests to static
webpages so they can be viewed with an ordinary browser (e. g. for
putting them on an CD-ROM). Several manifests (and their order) can be
specified to be converted at once to a single navigational structure.
Content is created according to templates,
which are separately specified and can be modified independently from
the program.
The template provided is just an example, although useful and
in practical use at the institute. It was tested to work on Mozilla
1.2.1 and Internet Explorer 6.0; other browsers might only understand
parts of the JavaScript included (e. g. DHTML navigation or "Toggle
Colorset").
The navigation of the HTML version should however work on any browser.
Standards compliance:
XInclude:
jConPac also supports the XInclude standard: Submanifests need
not be embedded physically, but can also be integrated logically. For
this, the following rules must be followed:
- Define the relevant namespace in the main manifest:
Integrate
xmlns:xi="http://www.w3.org/2001/XInclude" (Attention: This namespace was changed repeatedly by the W3C. Only exactly this one will work!) into
the "manifest" start tag.
- At the correct position for submanifests (i.e.after the end
of the resource part) insert the inclusion statement (e.g.
<xi:include
href="Subchapter/imsmanifest.xml"/>
to include the manifest
from the subdirectory "Subchapter" located directly below as a
submanifest ).
- Please note, that all manifests and submanifests
(regardless whether included or directly contained) must have
different names (attribute "id" of the "manifest" start tag)! This also
applies to all items, resources, etc.!
- Integration of an included submanifest into the navigation
is exactly the same as with physically contained submanifests.
Use e.g.
<item identifier="MAIN_ITEM_1"
identifierref="SUBMANIFEST_ORG" isvisible="true"/>
to reference the organisation with the id
"SUBMANIFEST_ORG", which is contained in a (sub-) manifest, and
integrate it into the navigation.
- Submanifests included per XInclude are not packed into ZIP
files.
|
|
2. User interface
jConPac is started by executing the batch file
"StartConverter.bat". Upon starting, the main window is shown (see
image).
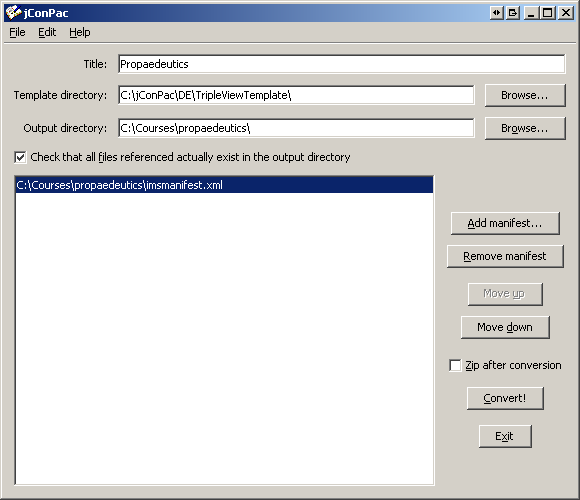
On it the main title of the project can be set (field
"Title"). This is used for replacing the comment "<!--
COMPILATION_TITLE -->" (see below under Templates).
It should describe the sum of all manifests together (e. g. "WeLearn
Offline-CD").
Below the title the directory of the template must be entered.
Selecting it through a dialog is possible with the "Browse ..." button
to the right of the field. This must be a directory with all the
template files and not a single file of the template itself. This is
verified by checking for the presence of the subdirectory
"ConverterFiles" (containing the static files of the template).
Below the template field is the field for the output
directory. It can also be selected through a dialog using the "Browse
..." button to its right. Again, this must be a directory and no single
file.
Attention: Existing files in this directory will be
overwritten by
files with the same name when created from the template!
The only exception are static files: These are only copied if no file
with the same name already
exist in the output directory or its creation date is before the date
from the template.
The checkbox below signifies, whether the program should check
that all referenced files (absolute links like http
or
ftp are NOT checked!) actually exist in the output directory. This is
useful for creating an image for a CD; uncheck it
to avoid unnecessary warning if the actual content is not in the output
directory. This flag has no influence on the conversion itself; its
just an added measure for the verification of completeness. Please note
that all HTML files will also be internally searched
for images, stylesheets, etc. and these are also checked for existence.
Larger manifests with lots of webpages might therefore take some time
to convert if this is selected.
The pane on the lower left shows a list of all manifests to be
converted in a single step. They will be shown in the navigation in
exactly the order they are in there. Adding a manifest is done by
pressing the "Add manifest ..." button, which allows selecting it in a
dialog. The
new manifest is inserted into the list right after the currently
selected manifest. The selected manifest can be removed from the list
(not deleted) by clicking on the "Remove manifest" button. Changing the
order of manifests is done by pressing the buttons "Move up" and "Move
down"; these move the currently
selected manifest within the list by one step.
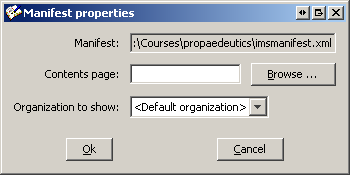
Double-clicking on a manifest or selecting "Change properties"
from the "Edit" menu allows entering an override page for the content and the
organization to render of this manifest (see image). The content page is the
page shown when clicking on the top-level icon of
this manifest. The default page is created through the template and
usually shows keywords and the description. As these cannot always be
entered through tools, but must be inserted manually into the manifest,
a static page can be selected here instead. This page will also be
copied to the output directory. To remove this substitional page, leave
the field empty.
Conversion is initiated by clicking on the button "Convert!".
If the configuration is incorrect, a small window with a message will
pop up and the cursor will be set to the incorrect field. If everything
is fine, conversion will start and open a new window showing the
messages created. Warnings are shown in orange, errors in red. If the
conversion finished without warnings or errors,
this dialog is automatically closed, otherwise it remains open for
examining the warnings and/or errors. These can also be saved to a text
file or printed.
If the checkbox "zip after conversion" is selected, all files
in the manifest will be zipped to one file after conversion. This
zip-file will be placed in the output directory
and will be named like the title (see field "Title"), e. g. "WeLearn
CD.zip". Befor zipping the file jConPac searches for all
references (links, images, ...) in the html-files (both created from
the templates and those referenced from resources in the manifest). If
some of these references are not referenced in the manifest, this files
will still be added to the zip-file.
The button "Exit" terminates the program without saving the
configuration to a file (but automatic saving may take place: See advanced configuration "automatically load
last state").
All these functions can also be reached through the "File" and
the "Edit" menu.
In the "File" menu you can additionally save or load the
current configuration.
The item "Advanced configuration" under the menu "Edit" shows
a dialog with rarely neededconfiguration options. See below for more information.
In the "Help" menu, a window with this file can be shown as
well as an about-box on this program.
|
|
3. Advanced configuration
Here several advanced options can be set. Most users will
change these settings only rarely.
|
- Automatically load last
state (Default: Checked): jConPac will
automatically save its state upon exiting to the users home directory
in
the file "default_configuration.xml", unless the configuration was
specified through the commandline (-f or -F). If this box is checked,
this file
is automatically loaded from the users home directory upon
starting the program, allowing you to instantly start from where you
left. When unchecked, the default configuration is saved empty (if at
all; see before) to
respect privacy and remove old settings.
- Check for files outside the output directory
(Default:
Unchecked): If
checked, jConPac will look whether any referenced files are
outside of the base output directory specified within
the normal user interface. Everything in the output directory or in any
subdirectories below is ok, everything else will produce a warning.
Files outside base directory are "dangerous", as they will usually be
an error and also be easily overlooked when packing into a ZIP file
(jConPac will pack them into the ZIP file if
this should be
created, but the path might not be correctly set to work in a browser
afterwards!).
Unchecked by default as the standard template references the file
"../start.htm", which is outside the output directory (one level above;
must be created manually) and would create a warning.
- Zip all files in output directory (Default:
Unchecked): If checked, all files within the output directory will be
recursively packed into the ZIP file, regardless whether they are
actually referenced. Otherwise only files from the mani fest as well as
those extracted from those contents will be zipped. This especially
applies to webpages opening other pages by JavaScript: Such links
cannot be found by searching the content. Ideally these would be
integrated into the manifest as files under the resource they belong to.
- Default language code (Default: Empty): With this
field a default language code can be specified. This is used when the
title of items or metadata information is multilingual. If this field
is empty, the default value from the template is used. This should be
specified not too specific: A language of "en-UK" will NOT match
metadata in the language "en", but only "en-UK". Conversely, a
specified default language of "en" will match "en", "en-UK" as well as
"en-US". "x-none" matches all
languages, i.e. all language versions will be shown. If several
strings match a language, these are all shown separated by commas.
Please note, that on rendering the metadata headings are still printed,
even when all detail information is suppressed because of the language
code!
|
|
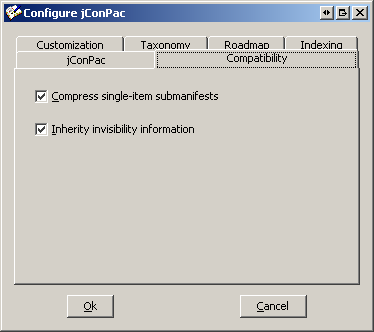
- Compress submanifests (Default: Checked): If a
submanifest
is included without any direct children (where it is referenced) and
the submanifest itself contains only
a single top-level item, no folder for the submanifest will be created
but instead the top-level item directly included instead of the
reference. This happens recursively. The standard-conforming (if
unchecked) version, which
strictly adheres to the IMS specification, will ALWAYS create a folder
for a reference to a submanifest (the reference is an item in its own
right and therefore receives an entry). Please note a special
consequence of submanifest compression: If an item references a
submanifest which will be compressed and the next sibling again
references the same manifest, the latter will NOT be shown in the
roadmap as these are essentially the same (the only other option would
be drawing a child which immediately points to its parent, as these are
exactly the nodes below itself!).
- Inherit invisibility information (Default: Checked):
According to the IMS
CPS specification, an invisible item is hidden, but its visible
children move into
its place. To hide a tree therefore all individual nodes must be marked
as
invisible. Also, this may result in "strange" results: A single node
might be replaced by many of its child (or even grand-grand-child)
nodes.
Therefore this option allows to inherit invisibility: If a node is
marked as
invisible, this node and all its children, grand-children, etc. are
suppressed
and not shown. Unmarked nodes are by default visible and therefore not
influenced by this option.
|
|
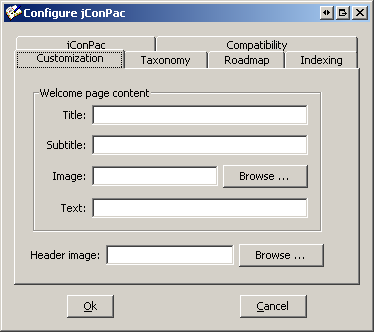
- In the welcome page panel you can set some fields to
change
the content of the welcome page. The fields title, subtitle, text and
image can be set arbitrarily. The image will be copied into the output
directory.
- The field header image indicates the image placed in
the
top left corner of every page. This will also be copied into the output
directory.
|
|
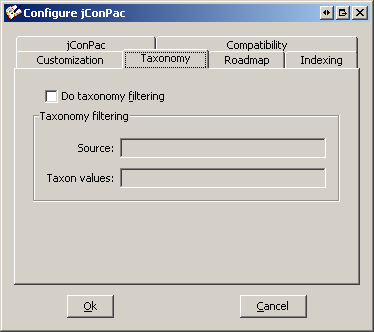
- Do taxonomy filtering
(Default: Unchecked): If enabled,
additional filtering of items can be done. The fields "taxonomy" from
the LOM standard are used to additonally
(in addition to the parameter "visible") decide, whether to show an
item during rendering or not. In the field "Source" the source for the
taxonomy to use for
filtering can be entered. If this field is empty, the first one
encountered is used (which might be different for each item). In the
field "taxon values" the content to be compared can be specified (this
refers to the id element of the taxon; the path can be specified by
slashes; e.g. "12.1/12.1.3"). Taxon values can start or end with a star
("*"): Any string can be at that position. Only
elements marked as this are shown.
|
|
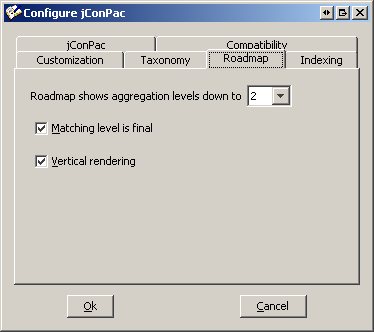
- Roadmap shows aggregation level (Default: 2): With
this the
aggregation level to show as nodes in the graphical roadmap can be set.
Available values are "All" (elements of all levels are shown) or the
values 1 (individual fragments, e. g. an image), 2 (learning unit, e.
g. webpage),
3 (course, e. g. several text files) and 4 (curriculum, e. g. several
courses). This has no influence on the rendering of the navigational
view (HTML, DHTML, Applet).
- Matching level is final (Default: Checked): If this
option is activated, searching for items to be rendered in childs is
stopped when encountering an item with the desired or lower level.
Example: When activated and the level=2 the structure 3/2/3/1 is
rendered as 3/2, while when deactived it is shown as 3/2/3.
- Vertical rendering (Default: Checked): If this field
is
checked, the roadmap will be rendered vertically (from top to bottom).
If unchecked, rendering is done from left to right
|
|
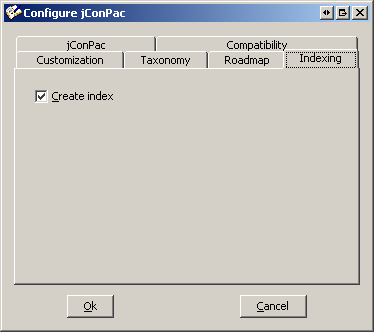
- Create index (Default: Checked): If this box is
checked, an index from all keywords contained in the manifests metadata
is created. The associated link is shown below the navigation in the
standard template. Clicking on the index page lead directly to the
relevant page.
|
|
|
4. Configuration files
The complete configuration can be saved to and loaded from a
file on the disk (or from the standard input). The content is stored in
XML according to the
XML-Schema included in the JAR file (schemata/ConfigurationFile.xsd).
|
|
5. Templates
Templates consist of two groups: HTML-files which will be
mangled and enhanced by information from the manifests wherever certain
tags (in the form of HTML comments) appear, and static files.
Templates: These come in several forms: Templates which
are mangled only once for all manifests together (*-template.htm or
*-template.html) and templates which are mangled for each manifest
(*-manifest-template.htm or *-manifest-template.html) or metadata
collection
(*-metadata-template.htm or *-metadata-template.html) separately. The
strings "-template", "-manifest-template", and
"-metadata-template" are removed from the output filename. In the case
of
multi-templates (manifests), each filename is
attached an undescrore and an unique label (e. g.
Contents-manifest-template.htm is converted to Contents_0.htm,
Contents_1.htm, and so on).
Static files: These are the files contained in the
subdirectory "ConverterFiles" of the template directory. These files
will be copied to the output directory if they do not already exist
there or are newer. Examples are images needed or static webpages.
List of tags: Tags are replaced only if they are in
the form
below (case-sensitive; parameter values containing whitespaces
must be within single or double quotes).
- <!-- TITLE -->: The title of the
manifest/resource/item. If none exists, the title of the whole
compilation which is entered by the user (see also UI above).
- <!-- WEBUITITLE -->: The title to be shown on the
welcome page. Can be set in the dialog "Advanced configuration".
- <!-- WEBUISUBTITLE -->: The subtitle to be shown on
the welcome page. Can be set in the dialog "Advanced configuration".
- <!-- WEBUITEXT -->: The text to be shown on the
welcome page. Can be set in the dialog "Advanced configuration".
- <!-- WEBUIIMAGE -->: The image to be shown on the
welcome page. Can be set in the dialog "Advanced configuration".
- <!-- HEADER_IMAGE -->: This image is shown in the
default template in the top-left corner on every page. Can be set in
the dialog "Advanced configuration".
- <!-- NAVIGATION -->: Inserts a complete tree for
navigation at this place. This tag has several parameters which can be
inserted in any order (the whole tag must still be on a single line,
however).
- "type": This parameter specifies which of the three
implemented navigations shall be created. "Java" uses a Java applet
(the complete applet code is generated), "HTML" creates pure HTML
navigation (with images showing the relation of the items), while
"DHTML" creates a DHTML tree navigation (elements with children
can be opened and closed, unrolling or collapsing the subtree).
- "target": This parameter specifies the name of the
frame the documents linked to from the navigation should be opened.
This is ususally a separate frame or window to the right of the
navigation.
- "content": It specifies the name of the file to show
when users click on the course itself. A matching template must exist
(e. g.: content="Overview" and a template
Overview-manifest-template.htm).
- "metadatapage": The name of the page to be linked
for metadata (e. g. "Metadata.htm" to be used with
"Metadata-item-template.htm").
Complete example: <!-- NAVIGATION target="basefrm"
type="dhtml" content="Contents.htm" metadatapage="Metadata.htm"
-->. This
creates a DHTML navigation with a target frame of "basefrm", links to
content pages of the form Content_0.htm, Content_1.htm, ... as well as
metadata pages (e. g.
"Metadata_3.htm").
- <!-- ROADMAP -->: At this position the roadmap image
with the imagemap is inserted.
- <!-- KEYWORD_INDEX -->: The index of the metadata
keywords is inserted at this position. Parameters available are:
- "type": This parameter specifies the type of navigation
for creating the "back-propagation" (clicking on the link not only
shows the associated document but also selects the position in the
navigation).
- "target": This parameter specifies the name of the
frame the documents linked to from the navigation should be opened.
This is ususally the same frame as specified in the navigation.
- <!-- INDEX_LINK_START -->, <!-- INDEX_LINK_END
-->: The complete text (incl. possibly HTML tags) between these
converter tags is suppressed if creation of an index is deactivated.
- <!-- METADATA -->: Signifies metadat rendering. The
following parameters must be used:
- "select": Specifies the
XPath expression to be rendered at this position. It will be executed
on the metadata (and only on these, e.g. not the element containing
it!) and the result will be rendered with the stylesheet (see below).
- "namespaces": Declaration of the namespaces used in th
XPath expression. The format is the following: [ Prefix ":"
Namespace-URI { ";" Prefix ":" Namespace-URI }].
- "stylesheet": Filename of the XSL stylesheet to be used
for rendering.
- <!-- MULTITEMPLATE_SUFFIX -->: Inserts the number of
the current manifests. Only valid within multi-templates. To be used
for cross-referencing another multi-template file for the same manifest.
- Examples of metadata specifications:
- <!-- METADATA
select="lommd:general/lommd:description"
namespaces="lommd:http://ltsc.ieee.org/xsd/LOMv1p0"
stylesheet="CombinedMetadata.xslt" defaultlanguage="en" -->
Renders the description from metadata according to the LOM standard by
employing the stylesheet "CombinedMetadata".xslt. As standard language
english is used. Descriptions from other standard will not be rendered,
as they will not match the expression!
- <!-- METADATA select="." namespaces=""
stylesheet="CombinedMetadata.xslt" -->
All metadata is rendered with the stylesheet "CombinedMetadata.xslt".
This applies to all namespaces (=standards).
- The elements TITLE, WEBUITITLE, WEBUISUBTITLE, WEBUITEXT,
WEBUIIMAGE, WEBUIHEADERIMAGE may contain the paramater "default". If
nothing is specified through the manifest/user interface, this value
will be used for replacement.
- All elements may contain the paramater "defaultlanguage".
This will be used as the default language in all cases where this is
needed/applicable, but only if in jConPac no language is set (the
"Default language" field is empty).
|
|
6. Installation and Requirements
To install jConPac, copy it to a directory of
your liking. However, you can also start it directly from the CD.
Requirements:
jConPac requires an installed Java Runtime Environment
(JRE). This can be downloaded for
free from Sun's Java Website.
|
|
7. Commandline parameters
jConPac can be provided with several values from the
commandline. These will override values loaded from any kind of
configuration (default file, specified file or console).
jConPac
can also be run without any GUI. No interaction is then possible (no
window will be shown) and conversion will start immediately with the
values supplied. jConPac terminates after finishing the
conversion. This mode has some restrictions however, because of the
limited values that can be specified on the command line:
- Only a single manifest can be converted.
- The contents page for the manifest or the organization to
render cannot be specified. The
default page and organization will always be used.
- Taxonomy filtering is not available.
- The welcome page cannot be customized.
- The header image cannot be customized.
- The roadmap cannot be customized.
- The index cannot be customized.
To utilize the full potential of jConPac a configuration
file must be created
and jConPac called with this file as source of configuration (e.
g. StartConverter -f config.xml -g).
Command line parameters are as follows:
Usage: at.jku.fim.CPSConverter.GUIConvert [-s title] [-n] [-u] [-g] [-z]
       [-m file] [-o directory] [-F] [-c] [-t directory] [-f file] [-?]
Command line options take precedence before a configuration file
 -g,--guiless                command-line version without any GUI; starts conversion immediately (non-interactive)
 -?,--help                   print command line parameters
 -F,--console                read configuration from console instead of from a file
 -c,--checkfiles             check that all referenced files exist in output directory
 -f <file>                   load configuration from given file
 -m,--manifest <file>        manifest to convert
 -n,--nosplash               don't show splash screen
 -o,--output <directory>     output directory
 -s,--title <title>          title of the compilation
 -t,--template <directory>   template directory
 -u,--upcheck                check for files outside the output directory
 -z,--zip                    zip files after conversion
|
|
8. Bugs and other
"special features"
- Included submanifests (i.e. when referencing one of their
organizations, not merely some resources contained in them) have no
associated link/page. This is not provided for in the standard. See
also the advanced configuration option
"Compress submanifests" for this.
- HTML files which are stored in UTF-16 Unicode format will
not be correctly parsed for contained references. These
external references will not be checked (or included in a ZIP-file) if
they are not included in the manifest as files (as they should be
anyway).
- When parsing HTML files for contained references, any
"base" attributes are ignored. This can lead to wrong error messages
about missing files. Also, these referenced files will not be packed
into a ZIP archive unless they are specified as files in the resource
section (as they should be anyway).
- Old configuration files (using a DTD and not the schema)
will cause validation errors on loading, as the format has changed
significantly. However, this can be safely
ignored. The data is read in as far as possible. Saving is possible
only in the new
format.
Please mind the following issues:
- Path names within the CLASSPATH
environment variable may not contain space characters (e. g.
c:\Program
Files\jConPac
is invalid) unless they are quoted (e. g. "c:\Program
Files\jConPac" is correct and works)!
- For the Applet navigation to work, in the
whole path to the JAR archive (which will be in a subdirectory of the
destination directory) no "Umlaut" or any other non-7-bit-ASCII
character may appear! This is a limitation of the Java Runtime
Environment.
If you encounter any other problems or bugs, please notify
us!
|
|
9. License
This program is free for personal and educational use. If you
like it, we would appreciate sending
a short message to us!
|